
I recently built a gaming PC this January 2019. It’s something I had always wanted to do but didn’t have enough saved up for it or didn’t know enough about what parts were good for what I wanted.
There’s also a lot of dos and don’ts with gaming PCs. It’s annoying because it’s stupid simple how easy it really is to put a good one together.
I basically watched a couple of videos that gave some decent guidance on everything but it was that profound. Building my part list came after I watched a YouTube video that had one for under $1000.
I put my parts on PC Partpicker even though most of it could have been done through Amazon Prime.
At the time I was still skeptical that I could pull off building a computer. I thought it wasn’t as simple as ordering these parts from a random video I saw one time.
I showed this build to EVERYONE and they each had their own opinion about it. The general consensus was that it was a fantastic build.
Here’s What I Would Do Differently
It’s wicked simple to build a gaming PC. The very first video I saw was about building one for under $1000 and it honestly gave me everything I needed to know.
I wrote this article about everything I learned for building a gaming PC and what I would do differently to help make the process run a lot smoother.
If you have any further questions feel free to leave a comment or reach out at entertainmentden.ns@gmail.com. I’ll do my best to respond!
Table of Contents
Choosing the Right Parts
Ordering Your Parts
Building the PC
Up and Running: Installing Drivers
Mythbusting
Why I Chose the Parts That I did
Choosing the Right Parts
PC Partpicker and my experience with rebates: Most of you have probably heard of this website. It basically compiles a parts list based on the custom build settings that you have and checks for compatibility.
It also looks for the cheapest prices from different (reliable) websites that often have rebate forms to help shave off $20 for different parts.
Don’t factor the price drop of rebate forms because they take up to 6 weeks to be processed. They send it to you in the form of a cash card and it’s weird.
It doesn’t feel like you’re really saving money but they work if you’re willing to be patient.
- The AMD and Intel rivalry doesn’t mean anything. The people that split hairs over one or the other have bigger things in mind for performance such as video editing and 3D animation. For gaming, neither one really stands out and it comes down to which generation has slightly better performance (this year, AMDs Ryzen 5 actually did better than expected since the stigma was that Intel was better).
- You don’t need to show your build to everyone. There’s honestly way too much information about what the right way to build a computer is. Like pretty much everything in life, it always depends on the situation and what you want. I would honestly just show your build to the friend that’s going to help you build it or someone who actually knows a lot about computers who can just give you the “thumbs up.”
- It’s like getting a tattoo in some ways. Find all the parts that you want and if you still want those same parts when you have the money, you know it’s based on good decision-making vs being impulsive.
- RGB lighting was actually worth the extra increase in price for the RAM, motherboard, and graphics card. These parts lit up when I plugged them into the power supply and helped assure me they were on. It also makes your PC look a lot cooler. I recommend making it look more stylish. You’ll have to be next to it whenever you game anyway.
What my computer whiz friend told me about graphics cards:
Cards like the GTX 1070 and 1080 are only a couple atoms off in how well they process information. Cards that aren’t exactly on the mark for atom processing are labeled as 1070s and not 1080s or 1070TI’ s which means they SLIGHTLY underperform and are labeled as lower generation models.
This means their benchmarks are only slightly less due to some extremely minute differences. If anyone has more insight on this feel free to let me know because I thought that was interesting.
Ordering Your Parts
- Ordering all at once or in chunks over time doesn’t matter. It might seem like a risk to order parts one at a time over the course of months but it’s really not a big deal. I ordered mine all at once because I was worried I would have to return something. My friend is building a lower budget PC and he’s doing it bit by bit over time (and it’s working for him). If something is seriously defective with a part, I don’t see why a manufacturer wouldn’t be willing to help replace it. I can’t guarantee that, but you can also get a warranty with a part for a few extra bucks if you’re worried about that.
- Trust the sites PC Partpicker sends you too. I ordered my power supply from B & H Photo which didn’t even strike me as a computer website. I was skeptical because I had never heard of this site and I was about to make a$100+ purchase from them. They provided excellent service and delivery went smoothly. PC Partpicker only pulls from reliable sites even if you’ve never heard of them before.
- The prices of graphics cards and other parts will fluctuate month to month. I kept an eye on my GTX 1070 for a couple months before I bought it. It went from $379 to $450 down to $400 in a couple of months and it even changed week by week. Amazon didn’t tell me it would do that. My processor price also dropped $30 from when I first added it to my list.

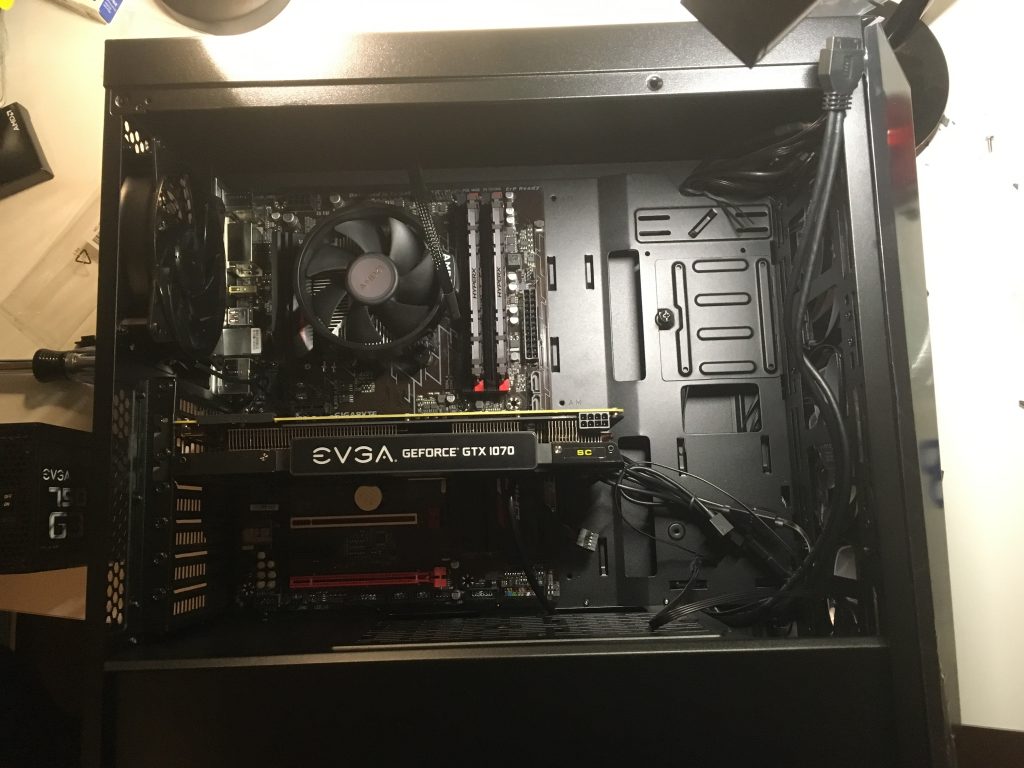
- HDMI CORDS: Remember to go buy a cheap HDMI cord from a salvage shop. I thought my case was supposed to come with it but it only came with the cables needed to hook itself up to the power supply (and wall outlet). Your graphics card will come with an HDMI input as well as your motherboard. Mine is hooked into the graphics card which I’m pretty sure leads to better performance.
- Don’t forget a Wifi stick or ethernet cable! I didn’t even know I would need that. I thought it would connect to the internet automatically through some superpower or something. Wifi sticks cost around $40 for a good one and I still don’t have my computer connected to wifi cause I haven’t gotten around to it.
- You can get Windows 10 for free. Joey Delgado is an awesome gaming PC YouTuber and he has an excellent video on how to get it for free. Check it out below.
If you can’t watch it right now, here is a synopsis of it.
- You need a flash drive bigger than 5GBs
- Download and install Media Creation Tool from the Windows website on a Windows computer, run through the steps
- Choose the flash drive when it asks you for a destination to save to and now you have a bootable flash drive that can install Windows 10 onto a new gaming pc
- Make sure this bootable file is the only thing on the flash drive and is formatted to a FAT32 (should be by default but just double check).
Building Your PC
- When you’re ready to build, open up all packages to verify that nothing looks jacked up or bent/broken. It’s okay if some packages feel like they have moving parts in them when you shake it. You’ll be able to tell pretty fast if something looks like it would be defective. Once you know you have everyone reasonably in order, you’re ready to go.
- Parts aren’t as fragile as you think. One thing you’ll naturally not want to do is bend your motherboard into place or force some SATA cables to fit into place. These parts are actually super sturdy and they won’t chip/break that easily. Sometimes you’ll need to just force a plug into place. I spent 30 minutes trying to get a SATA cable connected because I was too scared to just force connect it onto the motherboard.
- It’s ideal to have someone help you. It’s hard to watch a Youtube video and follow along because parts and structure all vary. Plus if you need extra help, the video can’t really give it to you especially if it’s your first build. Obviously, not everyone has a friend that could help them build a PC, but even just having an extra set of hands to help out can go a long way.
- You don’t need anti-static gloves or anything fancy. I even build mine on a desk and on the carpet and nothing blew up so I think that’s a good thing. Parts have become more advanced and are built to protect themselves from static during a build. The only thing you shouldn’t touch with your hands is the prickly part of the processor.
- Cord management is what works best for you. You don’t need videos that show you how to manage your cords. It should honestly be intuitive and if you’re doing it wrong, you’ll know because you made spaghetti out of cords. Definitely, use the zip ties that come with the parts (mostly the case). You’ll have more than enough and it’s okay if some cords are still visible through the main part of the PC case. They don’t all have to hide behind the back end frame.
- Cases that have LED lights in the fans will need to be hooked up to the motherboard. I haven’t seen a build where it goes to the power supply instead. I was also super confused on how the case was supposed to come to life until I found the spots on the motherboard labeled LED and plugged them in through there. The only parts manual I had to consult was the PC Case and that was actually helpful in showing me how to properly set it up. If your case has LED lights, the color of them can be changed in the BIOS upon booting up.
Up and Running: Installing Drives
This part was not intuitive to me at all! If it wasn’t for my computer whiz friend I would have never known to do this. I noticed that as soon as I installed Windows 10 and booted it up to the desktop, it wasn’t running as fast as I knew it should. I scrambled to set up a janky ethernet connection that stretched across the room in order to get internet.
My friend came over the next night and said it was running slow because it needed to have drivers installed onto the system to make all the parts more compatible with each other.
You need motherboard drivers and graphics card drivers to make everything come together. Search the graphics card brand and then “drivers” next to it and you’ll find the official site you need. For me, I downloaded mine from the EVGA official site. You can also get the motherboard driver from there too.
Note: wireless mice like Bluetooth Logitech brands will already work. I don’t have any devices that require me to connect directly using Bluetooth only but USB chips will work just fine. Your PC might require the extra installation of Bluetooth drivers to work with some headphones but a quick search on Google will easily help you figure that out.
Mythbusting and Assumptions
- Myth: Rebates make your build cheaper. I can see them saving someone no more than $75 at most! As mentioned earlier, they take almost a month to be fully processed after you print and mail them the rebate form. By then you’ve honestly forgotten about it and you’ll probably end up treating yourself to some nice dinner for $40
- Myth: Intel is better than AMD. Neither one is ultimately better. People who thought they were well versed in the PC world kept telling me it was a bad idea to go with AMD. I went with AMD and my Ryzen 5 is crushing it with load times and performance. My advice is to not get too hung up on the stigma. I took the approach as “if it works, it works.” My mindset was that if it allowed gaming to run smoothly and well on my computer, I didn’t really care who made it or what brand it was from. I strongly think ignorance is bliss in some of these situations.
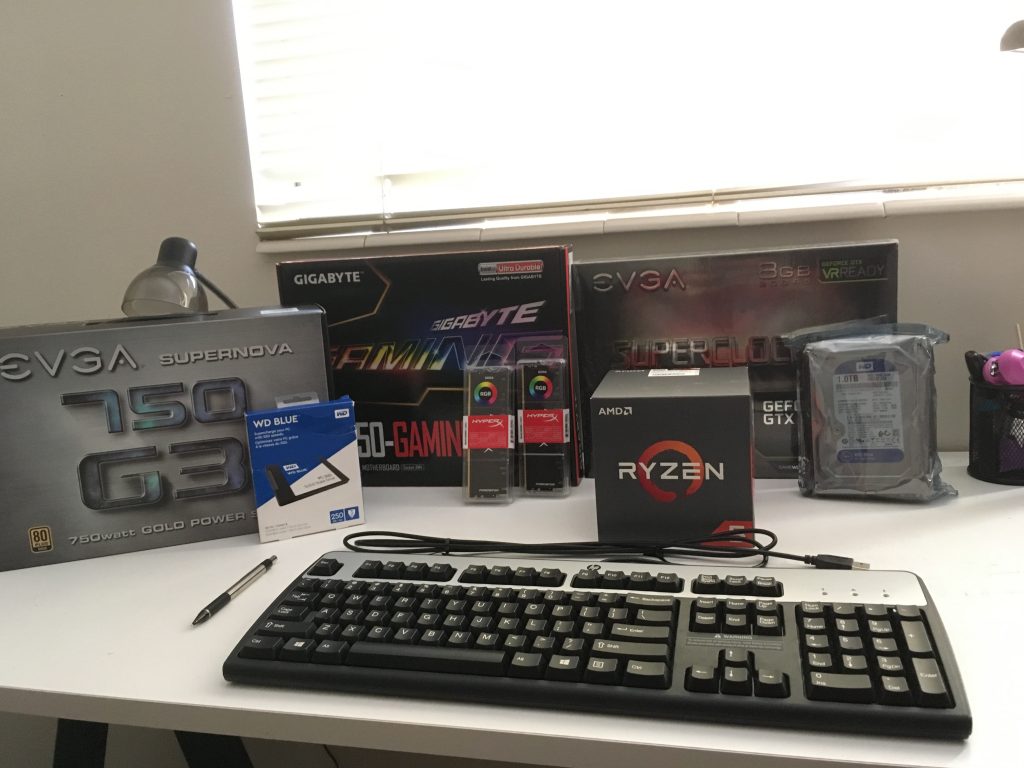
- Myth: Getting a budget power supply is fine. Make sure it matches the demands of the rest of your parts. A budget power supply isn’t going to be able to keep up with your “budgetless” graphics card and it probably won’t last as long. I originally was going to get a bronze power supply which would have been totally fine. But I knew that my build was strongly intended to be future proof and I wanted it to last a while so I waited and saved a little more to get a gold edition. Spending just a little bit more on a better power supply can expand the longevity of your computer as a whole. Of course, you can always upgrade power supplies a couple years down the road but for me, I just wanted to start off doing it right.
- Myth: Getting 2 cheaper graphics cards is better than getting 1 expensive one. I truly don’t think this has a profound enough difference to take an unconventional approach. Most people don’t do this and I think it’s because companies deliberately manufacture their cards to where getting one, a good one makes sense. A GTX 1070 will already give more power than two 1060s and even if someone finds a benchmark that contradicts what I’m saying, it’s not really a big difference if you just look at performance.
- Myth: More fans equals more noise. Honestly don’t even worry about fan noise. My case came with four and in total, I have 7 and I hear absolutely nothing. Of all things, I was most impressed by how quiet my rig is. I thought it was going to be loud and vocal like my PS4 was after powering it up but it completely the opposite. I even had to check to see if they were really on because I didn’t hear anything. Standard fans are going to do their job quietly and extremely well, and sometimes even have LED features.
Why I Chose the Parts That I Did
I’ll link to my PC Partpicker list so you can see the exact build I got but first let me explain the thinking behind why I got each one. Also note that you can get most of these on Amazon prime but some parts might be slightly more expensive or unavailable if you only do it through them.

I didn’t really know much about cases and what to look for, but this one looked cooled and came with a glass pane window. It was also well within my price range and was selected in the $1000 budget video that I saw. I absolutely love it and I’m glad I also went for a case that had some style to it.
You can change the colors on it whenever you want in the Bios and it comes with all the cords you need for hooking up the power supply and motherboard for the lights. The fans are super ultra silent as well.

AMD is awesome and I don’t know why people critique it so much. AMD is an excellent option for 2018 and even Linus Tech agrees. This thing is so fast that I don’t even have time to read the hints during load times in Just Cause 4. Processors come with a fan that goes directly overhead the processor which is why the package will be slightly big and heavy.
At first, I thought 3.2 GHz was on the lower side of processing power but anything over 3.0 is going to be really good. I originally wanted 3.5 or above which is what a lot of people seemed to recommend but I’m a living testament that it doesn’t matter. I got this one for around $150 which I think is a very good price for the quality of this thing.

Any GTX 1070 will do! I don’t ever plan on overclocking and I’m not sure why I thought I needed this version of the GTX but I still like it. I paid a little bit more for it than a normal one would run for but that was also because the price of this was on the low end when I was buying. I would have purchased a standard 1070 if that wasn’t the case.
Any brand or company of GTX will do if you plan on getting their cards. Keep in mind their prices go up and down the most but hopefully, we’ll see the end of the crypto mining crisis fairly soon.

I literally just got this because I saw someone on a Youtube video recommend this as a good motherboard for a $1000 PC build. I really didn’t put any more thought into it. I asked some of my gaming friends if they thought this was good and none of them had anything negative to say about it.
It works just like a motherboard should. It’s sturdy even though it bends and I had to force some SATA cables onto it, which it handled well. It lights up and is a perfect fit for the Cooler Master case. I’m not sure what more would constitute a good motherboard other than those qualities.

Bronze was my original plan but I really wanted to save up a little more and get a gold. This gave me the reassurance that I would really future-proof my build for many years down the road. I also got it for just under $100 not even including the rebate price.
It comes with more cables than you’ll need when you start building and it fits perfectly under the Cooler Master case. It powers up my PC super fast and makes me confident that I’ll be able to throw whatever I want at it. If you can, just try and upgrade to gold.
Kingston Hyper X, 2 sticks of 8GB Each

I got two of these to equal 16GBs of ram and it’s worked incredibly well for me so far. I’m not super confident that I know why having 16GB of ram is essential but it was definitely the right move. You can get one stick for $80 so the total price would be the same as the processor.
These click easily into place on the motherboard and light up to let you know that they’re working once powered on. There’s no specific brand of RAM sticks you have to swear by I just came across these because I saw a video where someone used them and I trusted it.
Solid State Drive and Storage: I purchased a product on Amazon called WB Blue 500 GB of Solid State drive. Make sure your storage is always solid state. I never once came across any information that advised to not get Solid State. I went with 500GB of storage which I got for about $75 on Amazon. I honestly don’t think I’ll need to upgrade my storage because if I run out of space I’ll just delete some games from Steam if I don’t plan on playing them for a while.
If You Need Accessories
I already wrote an article on gaming accessories such as keyboards, mice, and other stuff which you can see here. It’s a brief article that could give you some ideas for your set up. Thanks for reading!
Link to my PC Part List
https://pcpartpicker.com/list/hHF7Hh
This is 100% non-sponsored and I don’t receive any commission if you purchase through this link. I just attached it if you were really interested in the parts I selected for my build. As always, if you have any questions feel free to leave a comment and I’ll do my best to respond.
In total, my build cost just a little over $1000, not including rebate or taxes. I’m submitting two rebate forms this week but I don’t think I’ll receive any checks for at least a month on it.