Introduction
Fiber optic ceilings are the single coolest thing you can decorate your home theater with! I’ve been researching these things for a couple of years just out of my own curiosity and desire to eventually install one in my future house (which I don’t have yet). You might have come across this article because you’re either curious about what exactly these are, or you’re curious as to how people manage to have these in their home theater setups.
Table of Contents
What is a fiber optic ceiling?
How do I get one?
How much do they cost?
Resources for getting started
Other tips before getting started
In this article, I’ll share with you all the helpful information that I’ve come across regarding fiber optic ceilings. I did a lot of the painstaking research so you won’t have to! Just a quick note before I begin: this article doesn’t specifically show you how to create a fiber-optic room. But it will most definitely point you to some awesome resources after you have a solid base of understanding.
As always, feel free to reach out to me at entertainmentden.ns@gmail.com and I’ll do my best to respond to any comments you have.
What is a fiber optic ceiling?
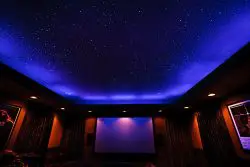
A fiber optic ceiling is typically a custom-built ceiling that gives the viewer the illusion that there are nighttime stars above them. It’s similar to what you would see if you were star gazing up at night from your campsite. If you’ve ever been to Elephant Bar or a planetarium room you’ll know what I’m talking about.
Another name for a fiber optic ceiling is also a star ceiling. You can find dozens of pictures on Pinterest to get some pretty cool design ideas or just general inspiration. Most examples you find on the internet are DIY projects and are simply just suspended ceilings. Unless you deliberately plan a fiber optic roof before building a home, it’s best to use a suspended ceiling below the original one.
A lot of people like to put LED lights around the frame of their ceiling to make the stars really pop out and give it a more modern vibe. The possibilities are literally endless with how elaborate you can make them. I’ve seen videos of people who even put them in the ceiling of their car!
Ultimately, they’re just really cool ceilings that make your home theater look so much better. From the research that I have done, they’re not as expensive as you might think. We’ll cover the cost breakdowns for what it takes to have one of these later in the article.
Important Note: There are ways to paint murals onto your ceiling to create the same effect, as shown in the picture below. This is not a fiber optic ceiling but still gives an impressive night sky appearance.
Check out the Night Sky Murals site for more.
How do I get one?
90% of the time, I found that most people made them on their own. I’m no engineering genius so this looked intimidating to me. But the construction of one of these really comes down to drilling in a wooden frame and laying out the lights through the tiny holes you made in the platform.
I know for a fact I will utilize some sort of professional installation team just so I don’t have to worry about messing up the electrical connections when doing this. Everyone’s situation is different and the layout of your house determines how difficult it’ll be.
The easiest way to go about making these yourself is to buy a fiber optic installation kit online. They tend to be a couple of hundred dollars, but you’ll save a lot of time and hassle compared to making one completely from scratch. The next most expensive element would be supplying the platform to put the lights on. Buying pre-made platforms can cost around $600-1000 for a 4’x6′ from most manufacturers. That’s why a lot of people go to Home Depot to create their own.
It’s easy to find pictures online of people who have the most ideal set up when it comes to star ceilings. But even the most awkward of shapes can accommodate them. It just takes the added step of consulting a professional.
It might be a better idea to consider creating your own in order to reduce the overall cost of one. Some kits can be more expensive than others depending on the company.
How much do they cost?
There are a couple of things that affect the price of a fiber optic ceiling. Some of them are more apparent than others but I tried to include everything you would want to know so nothing takes you by surprise.
Most of the setups I found online were built for around $500-700 after factoring in the installation and the actual fiber optic ceiling.
- The physical factors that affect the price start with how big you want it to be (length and width, usually measured in feet).
- Star density: how many stars do you want throughout your entire ceiling? Do you want them to be able to change colors or all be a uniform white light?
- Do you want filament or cable optics? Filament optics are thinner and you can use them to put in significantly more lights than cable optics. Cable optics are thicker and good if you don’t want dozens of light scattered across your entire ceiling (only wanting a few here and there)
I tried really hard to get an estimate of the cost breakdown with actual numbers! But there are endless possibilities and price ranges that you can expect to see when making one of these.
The best option to get the most accurate price quote is to call a local company and provide them with your ceiling’s dimensions. I’ll link to the various companies you can use at the end of this article.
Check out this really useful graph to determine how much fiber you’ll actually need. You’ll need to measure the dimension of your ceiling before utilizing the graph.
What Affects the Cost of Fiber Optic Ceiling?
There are some important things you need to know that affect the overall cost of installing a ceiling. Whether you decide to have a professional set up or completely do it yourself, here are the obvious (and not so obvious) factors you need to consider:
- Size: the size of the board itself is actually not as important, but you will have to inevitably increase the star density as a result. If you only increase the size, you likely won’t have the amount of dispersion you want to create a true “star gazing” effect.
. - Star Density: This one depends completely on you. Some people like a crap ton of stars populating the entire board. Others prefer to only have a few here and there in an irregular pattern. Finding your own fiber optic cables is the best thing you can do before having a professional set it up. Deliberately supplying your own cables gives you way more personalization than giving full autonomy to the setup guy.
. - I highly recommend you call a local company to get a realistic quote. As much as I want to put in a bunch of charts that provide price ranges, it’s honestly not helpful! It always comes down to personal preferences based on the factors mentioned above. Getting a quote is really easy. Just measure your desired ceiling and give them a call
. - Outlets: More cases than not, you’ll need to install additional ones throughout your ceiling. Most people choose to do a drop-down ceiling instead of replacing the foundation. That means the electrical cords will have to be routed in between the original ceiling and the fiber optic platform. It takes some decent planning and some sweat equity to make it happen the correct way, but it’s well worth the investment. Expect to need a couple hundred dollars to pay for the labor of installing new ones.
Here’s a Useful Formula To Determine How Much Fiber You’ll Need:
Estimate how much fiber you need: ROOM LENGTH X WIDTH. Calculate this number and then use this graph (taken from thefiberopticstore.com).
I found a good example from the site listed above as well. They wrote an article about one of the builds they did and here are some of the details. The company created a pirate ship themed movie theater with a fiber-optic ceiling. They had 1000ft of fiber cord, .50mm thickness (average), at 110 volts for less than $500! I’m not sponsored at all from their site, but I highly recommend checking it out if you want more details about this specific one they did.
A Great Example of a DIY Fiber Optic Ceiling
This is a great video that does a great job showing what a complet DIY set up would look like. If you notice in the video, you can see they had to have deliberately placed outlets on the side and even on the roof. That part will most likely require expert set up unless you already know how to do that.
- They had to paint their room black and incorporate an LED backlight to make the stars more apparent. These little details go a long way, and if you can afford the additional investment of the paint and using simple LED strips.
- Notice the original angle of their ceiling. Their original foundation was at a 45-degree angle but their finished product was almost completely flat. The most natural look you can give your ceiling is to do it the way they did it and to create a “drop-down” ceiling effect.
- They used a simple, wooden skeleton platform. You could easily assemble the same, crisscrossing design they did. In fact, this one works best and a lot of people go this route. Notice how all they had to do after was staple a hard covering paper material to the structure where the optical lights would go.
- The most complicated part is organizing the fiber optic lights and securing them in an appealing fashion. One side of their board looked absolutely chaotic! They carefully threaded each of the fiber optic lights through the drilled holes and then used zip-ties and glue to fasten the bunched up cables.
Great Resources For Fiber Optic Installation
I came across some great sites that provide some extremely useful insight if you want to take the first steps into creating your ceiling. Many of them have customer service numbers that you can call to get quotes even if they don’t provide direct services in your area.
- TheFiberOpticStore– this site helps complete newbies better than any of the other ones. They provide a ton of in-depth information on how to set up your first one. They also have a page for commonly asked questions and provide detailed answers. I also like how they post some of their biggest projects and explain how they professionally did it.
. - Wiedmark– This company is best known for having dedicated fiber-optic kits you can order straight from Amazon! They also have some useful, but not so common tools for installing your own drop-down ceiling. They have a decent range of prices for their tools.
. - CosmicRooms– I love this site! I found it a long time ago on Pinterest when I was still living with my parents (I know, corny) and was trying to create something similar to a fiber optic ceiling. These guys create a “mural” like the design on your ceiling that completely resembles and gives a galactic illusion. It’s essentially a mural that makes you feel like you’re stargazing. They claim they have a secret way of creating them, which is what also makes them so unique. Check out their site for more details.
Other Important Things to Know
If you’re really planning on making one, make sure you are installing one in a room that can block out ambient light. Otherwise, you loose out on the true effect it can have. I did a lot of research on ceiling set-ups and I highly recommend making one with an LED backlight. It makes the overall set up look so much nicer and complete (I’ll definitely be outlining the platform with some ambient light).
My Recommendation For Removing Light Pollution
My family ordered these blackout curtains a couple of years ago and we’ve been using them since. They are great if you feel you need to remove some more ambient light. I can also say they will be super useful in making your future fiber optic ceiling really “pop” (and they’ll dramatically increase your projector image quality). It’s nothing too fancy, but it definitely does the trick and it’s worth mentioning.
You will definitely need ceiling access from above when installing a fiber optic ceiling. It’s best if you can find a way to utilize the above attic for routing some of the cords or even for outlets. More cases than not, you will be making your fiber optic ceiling a “suspended ceiling.” This means just putting the platform under the real ceiling and shaving a few inches off the height of that room.
.
AVOID USING SUPER GLUE: This type of substance does not bind well with small fiber cords. You need to use glue that is considered “fiber safe.” Elmer’s glue is perfect for a project like this. Make sure you avoid Gorilla glue or other similar brands.
.
Understand there is a profound difference between Fiber Optic Filaments and Fiber Optic Cables.
The main difference has to do with how the cords are bunched up together and connected to the power source. Cables are easier to customize because you can individually place each and every optical light exactly where you want it. You won’t have to struggle to feed individual cords through the holes you drilled in the platform.
Filaments are quicker to install though, and they are cheaper per light. It’s harder to manage them when you have to deal with more cables though. You can purchase them by the hundreds, but they are less durable and not as thick. It really depends on how many stars you want and how you want them to look. A real night sky will likely have fewer stars, but some people really like making their ceiling look completely populated with them.
Conclusion
Creating a fiber optic ceiling can be a very fun project! It’s something that can give you such a wide range of customization options and you don’t have to be rich to make it happen! Don’t let it feel like a foreign concept, as this article hopefully gave you some useful insight into how to take the first few steps. It definitely took me a lot of research before I felt like I had a solid understanding, but this article was also meant to help you significantly shortcut the research process.
My family is in the moving process right now and we’re in the process of installing a more dedicated home theater. We’ll be sure to utilize all of these things that I’ve shared with you, as this has definitely helped us with our planning process. As always, if you have any comments or anything, feel free to reach out to the email in the link at the top of this article. Thank you for reading and be sure to check back often for the next article. Also, feel free to send me topic suggestions if you want to see more related content.